Connecting your Website to Surfside Analytics
The following sections describe how to integrate your website with Surfside Analytics to track ecommerce events. There are two ways to integrate your side: either with the Surfside Browser SDK or with the Surfside Node SDK.
0. Prerequisites
Before getting started, please review the following guides:
- The Surfside Analytics Tag: Learn about the Analytics Tag, its purpose, and the data it captures.
- Ecommerce Events: Understand the types of ecommerce events, their associated data types, and key actions. This guide will help you identify required attributes and how to track as much data as possible.
The Surfside Inspector Chrome Extension
The Surfside Inspector Chrome Extension is a powerful tool that allows you to inspect and debug Surfside Analytics events directly in your browser. It provides real-time feedback on the events being sent to Surfside, helping you verify that your tracking is working as expected.
How to Use
Install the Surfside Inspector Chrome Extension
Open your website in Chrome, launch the Chrome Developer Tools, and navigate to the Surfside tab to view events as they are sent.

- As you implement the Surfside Analytics Tag and ecommerce events, use the Inspector to confirm that events are dispatched correctly. Focus on the
Ecommerce Eventrows, which correspond to your tracked ecommerce actions.
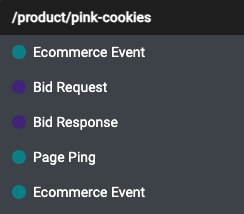
While navigating through your website and performing ecommerce actions, you should see these events appear in the Inspector. If you do not see the events, double-check your implementation to ensure it is correct.
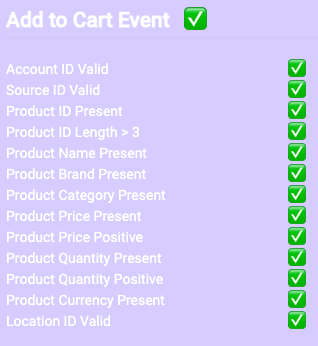
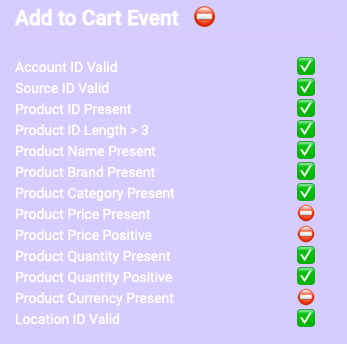
Verify events using the Events QA Auditor. Click the “Events QA Auditor” in the extension toolbar to view each triggered event along with its associated attributes. This tool provides a structured overview of ecommerce activity, helping ensure that implementations are firing as expected.
Identify missing or incorrectly implemented attributes. Each event type is reviewed for required attributes—if all are present, a ✅ checkmark is shown; if not, a ⛔️ red icon indicates what’s missing or incorrect.
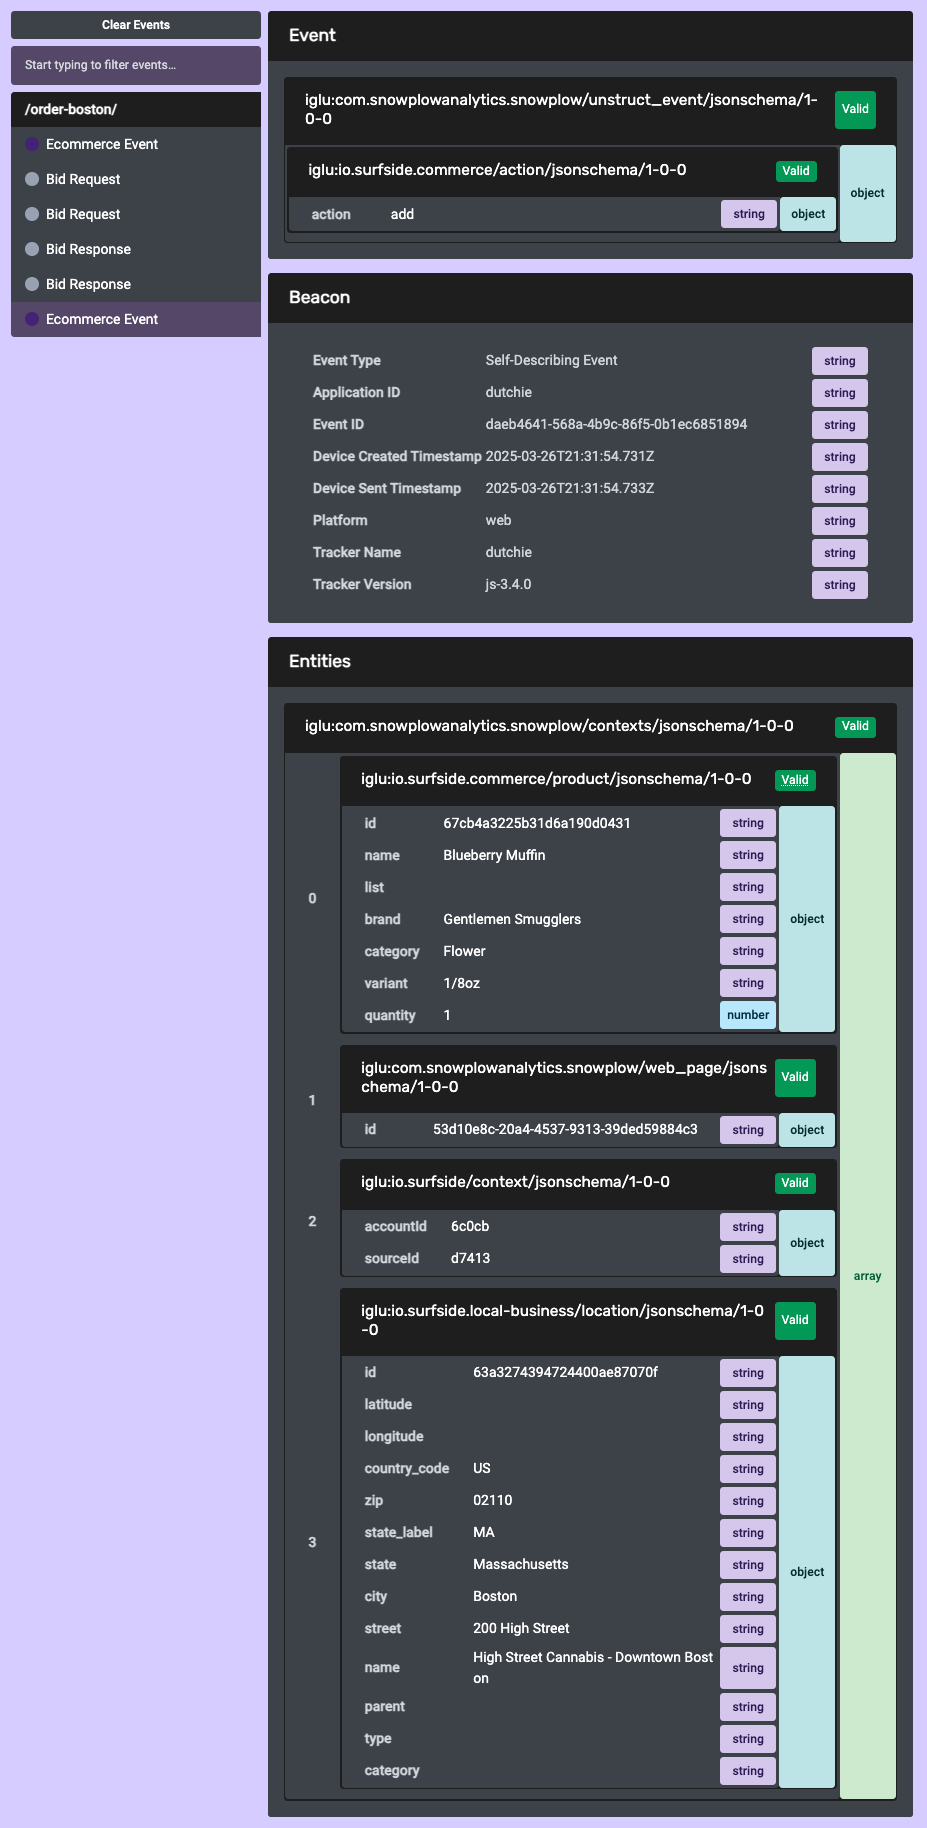
- On the main page, to view full details about any event, click the event row to expand the event details. This will show all attributes and values associated with the event.
Choosing the right SDK
At this point, you have learned about the Surfside Analytics Tag, the edge.js library, what user interactions to track on your website. Now, it's time to integrate Surfside Analytics to track both website and ecommerce events.
- Surfside Browser SDK
- The Surfside Browser SDK is a lightweight JavaScript library that allows you to track events on your website using the
surf()command. We recommend this option if you are working with a static sites, client-side web applications, or lightweight projects using vanilla JS.
- The Surfside Browser SDK is a lightweight JavaScript library that allows you to track events on your website using the
- Surfside Node SDK: This is a Node.js library that allows you to track events on your website using the
@surfsidenpm packages. We recommend this option if you are working with modern web frameworks like React.js or Next.js.
Choose the SDK that best aligns with your website’s architecture and tracking needs, and carefully follow the instructions in the following sections to ensure a seamless and accurate integration. Don't hesitate to Contact Support if you need assistance.
1. Load Surfside Analytics
To load the Surfside Analytics plugin, use the following code snippet:
accountIdandsourceIdare both provided by your Surfside representative
[[Unique Location ID]]is a unique identifier, such as a Store or Retail Id.
- Surfside Browser SDK
- Surfside Node SDK
<!-- Surfside Analytics -->
<script>
  ;(function(s,u,r,f,i,n,g){if(!s[i]){s.surfContext=s.surfContext||[];
  s.surfContext.push(i);s[i]=function(){(s[i].q=s[i].q||[]).push(arguments)
  };s[i].q=s[i].q||[];n=u.createElement(r);g=u.getElementsByTagName(r)[0];n.async=1;
  n.src=f;g.parentNode.insertBefore(n,g)}}(window,document,"script","//cdn.surfside.io/sdk/1.0.0/edge.js","surf"));

  // Initialize Surfside Analytics
  surf('newTracker', 'digital', '//col.surfside.io', {
      appId: 'digital',
      cookieName: 'surf',
      discoverRootDomain: true,
      cookieSameSite: 'Lax',
  });

  // Set the accountId and sourceId
  surf('source:digital', {
      accountId: 'XXXXX', // Your account ID
      sourceId: 'XXXXX', // Your source ID
  });

  // Do not include these lines if you are a multi-location business
  surf('setLocation:digital', {
      id: '[[Unique Location ID]]',
      ... // other location values, see below
  });

  // Enable activity tracking
  surf('enableActivityTracking', {
      minimumVisitLength: 30,
      heartbeatDelay: 10,
  });

  // Enable link click tracking
  surf('enableLinkClickTracking')

  // Track a page view
  surf('trackPageView')
</script>
<!-- End Surfside Analytics -->
First, install the Surfside SDK
npm install @surfside/browser-sdk @surfside/surfside-eventsyarn add @surfside/browser-sdk @surfside/surfside-events
Then, load Surfside Analytics
import { newTracker, setUserId, enableActivityTracking, trackPageView } from '@surfside/browser-sdk';
import { SurfsideCommercePlugin, source, setLocation } from '@surfside/surfside-events';

const trackerId = 'digital';
const endpoint = '//col.surfside.io';
const accountId = 'XXXXX'; // Your account ID
const sourceId = 'XXXXXs'; // Your source ID

const surfConfiguration = {
    appId: 'digital',
    cookieName: 'surf',
    plugins: [SurfsideCommercePlugin()],
    contexts: {
        webPage: true,
    },
};

// Initialize Surfside Analytics
newTracker(trackerId, endpoint, surfConfiguration);

// Set the accountId and sourceId
source({
    accountId: accountId,
    sourceId: accountId,
});

// Do not include these lines if you are a multi-location business
setLocation({
    id: '[[Unique Location ID]]',
    ... // other location values, see below
});

// Enable activity tracking
enableActivityTracking({
    minimumVisitLength: 30,
    heartbeatDelay: 10,
});

// Track a page view
trackPageView();
Once the tracker object is created, you can leverage the following e-commerce tracking features to capture key user interactions.
2. Tracking Location
To associate a physical location with your event, use setLocation() to specify the event's location. Location values help identify unique sites that may be part of larger accounts or sources (e.g., a store ID for a retail chain with multiple locations).
For multi-location clients, dynamically update the setLocation() method by changing the id and other relevant fields whenever a user selects a new location. This can be triggered by events like selecting a different store from a dropdown menu.
Note: The
setLocation()event does not need to be fired for each ecommerce event. It only needs to be set once per session or when the user changes locations.
setLocation() can contain any of the following values to distinguish a unique location event:
| Key | Value Type | Required | Description |
|---|---|---|---|
| id | text | YES | The unique identifier, such as a Store or Retail ID. |
| latitude | text | No | The location latitude. |
| longitude | text | No | The location longitude. |
| country_code | text | No | The country code associated with the location. |
| zip | text | No | The zip code associated with the location. |
| state_label | text | No | The state label associated with the location. |
| state | text | No | The state associated with the location. |
| city | text | No | The city associated with the location. |
| street | text | No | The street associated with the location. |
| name | text | No | The name associated with the location. |
| parent | text | No | The parent location associated with the location. |
| type | text | No | The type associated with the location. |
| category | text | No | The category associated with the location. |
- Surfside Browser SDK
- Surfside Node SDK
<script>
  surf('setLocation', {
    id: location.id, // Store or Retail ID
    latitude: location.latitude,
    longitude: location.longitude,
    country_code: location.country_code,
    zip: location.zip,
    state_label: location.state_label,
    state: location.state,
    city: location.city,
    street: location.street,
    name: location.name,
    parent: location.parent,
    type: location.type,
    category: location.category,
  });
</script>
import { setLocation } from '@surfside/surfside-events';

setLocation({
    id: 'store-123', // Store or Retail ID
    latitude: 37.7749,
    longitude: -122.4194,
    country_code: 'US',
    zip: '94105',
    state_label: 'CA',
    state: 'California',
    city: 'San Francisco',
    street: '123 Main St',
    name: 'Surfside Store',
    parent: 'Surfside',
    type: 'store',
    category: 'retail',
});
3. Measuring Ecommerce Actions
Product Detail
This event is triggered when a user views a product detail page on your website. It should only be fired once per product detail page view.
Note If a user navigates to a different product detail page, this event should be fired again with the details of the new product.
- Surfside Browser SDK
- Surfside Node SDK
<script>
  surf('addProduct:digital', {
    id: item.id, // The ID
    name: item.name, // The name (string)
    list: item.list, // The list (string)
    brand: item.brand, // The brand (string)
    category: item.category, // The category (string)
    variant: item.variant, // The variant (string)
    price: item.price, // The price (number)
    quantity: item.quantity, //  For product detail views, this should always be 1
    coupon: item.coupon, // The coupon (number)
    position: item.position, // The position (number)
    currency: item.currency, // The currency (string)
  });

  surf('setCommerceAction:digital',
    'detail' // Product Detail Action
  );
</script>
import { addProduct, setCommerceAction } from '@surfside/surfside-events';

addProduct({
    id: '12345',
    name: 'Awesome Sneakers',
    list: 'Search Results',
    brand: 'Nike',
    category: 'Footwear',
    variant: 'Red Size 11',
    price: 79.99,
    quantity: 1, // For product detail views, this should always be 1
    coupon: 'SUMMER2024',
    position: 2,
    currency: 'USD',
});
setCommerceAction('detail');
Add to Cart
This event should be fired when a user successfully adds an item to their cart.
- Surfside Browser SDK
- Surfside Node SDK
<script>
  surf('addProduct:digital', {
    id: item.id,
    name: item.name,
    list: item.list,
    brand: item.brand,
    category: item.category,
    variant: item.variant,
    price: item.price,
    quantity: item.quantity, // The quantity of the product added to the cart
    coupon: item.coupon,
    position: item.position,
    currency: item.currency,
  });

  surf('setCommerceAction:digital',
    'add' // Add to Cart Action
  );
</script>
import { addProduct, setCommerceAction } from '@surfside/surfside-events'

addProduct({
    id: '12345',
    name: 'Awesome Sneakers',
    list: 'Search Results',
    brand: 'Nike',
    category: 'Footwear',
    variant: 'Red Size 11',
    price: 79.99,
    quantity: 3 // The quantity of the product added to the cart
    coupon: 'SUMMER2024',
    position: 1,
    currency: 'USD'
});
setCommerceAction('add');
Remove from Cart
Similar to the Add to Cart event, this event should be fired when a user successfully removes an item from their cart.
- Surfside Browser SDK
- Surfside Node SDK
<script>
  surf('addProduct:digital', {
    id: item.id,
    name: item.name,
    list: item.list,
    brand: item.brand,
    category: item.category,
    variant: item.variant,
    price: item.price,
    quantity: item.quantity, // The quantity of the product removed from the cart
    coupon: item.coupon,
    position: item.position,
    currency: item.currency,
  });

  surf('setCommerceAction:digital',
    'remove' // Remove from Cart Action
  );
</script>
import { addProduct, setCommerceAction } from '@surfside/surfside-events';

addProduct({
    id: '12345',
    name: 'Awesome Sneakers',
    list: 'Search Results',
    brand: 'Nike',
    category: 'Footwear',
    variant: 'Red Size 11',
    price: 79.99,
    coupon: 'SUMMER2024',
    position: 1,
    quantity: 3 // The quantity of the product removed from the cart
    currency: 'USD'
});
setCommerceAction('remove');
Checkout
This event occurs when a user initiates the checkout process.
- Add the transaction data for the checkout. This includes the transaction ID, revenue, tax, shipping, and other details.
- Add the product(s) included in the checkout.
- Set the commerce action to checkout.
Note: If the
idof the order is not know at the time of the checkout event, it does not need to be set. However, it is required for thepurchaseandrefundevents.
- Surfside Browser SDK
- Surfside Node SDK
<script>
  // The transaction data for the checkout
  surf('addTransaction:digital', {
    id: 'TRX-7890', // Transaction ID
    affiliation: 'Nike Online Store', // Transaction Affiliation
    revenue: 239.97, // Transaction Revenue
    tax: 19.20, // Transaction Tax
    shipping: 5.99, // Transaction Shipping
    coupon: 'SUMMER2024', // Transaction Coupon
    list: 'Shopping Cart', // Transaction List
    step: 1, // Transaction Step
    option: 'Visa', // Transaction Option
    currency: 'USD', // Transaction Currency
  });

  // The product(s) included in checkout
  surf('addProduct:digital', {
    id: '12345',
    name: 'Awesome Sneakers',
    list: 'Shopping Cart',
    brand: 'Nike',
    category: 'Footwear',
    variant: 'Red Size 11',
    price: 79.99,
    coupon: 'SUMMER2024',
    position: 1,
    quantity: 3 // The quantity of the product in the cart at the time of checkout
    currency: 'USD'
  });

  surf('setCommerceAction:digital',
    'checkout' // Checkout Action
  );
</script>
import { addTransaction, addProduct, setCommerceAction } from '@surfside/surfside-events';

// The transaction data for the checkout
addTransaction({
    id: 'ORD-12345',
    affiliation: 'Surfside Store',
    revenue: 109.98,
    tax: 8.99,
    shipping: 5.00,
    coupon: 'SUMMER2024',
    list: 'Shopping Cart',
    step: 1,
    option: 'Visa',
    currency: 'USD',
});

// The product(s) included in checkout
const cartItems = [
  {
    id: '12345',
    name: 'Awesome Sneakers',
    list: 'Search Results',
    brand: 'Nike',
    category: 'Footwear',
    variant: 'Red Size 11',
    price: 79.99,
    coupon: 'SUMMER2024',
    position: 1,
    quantity: 3, // The quantity of the product in the cart at the time of checkout
  },
  {
    id: '67890',
    name: 'Cool T-Shirt',
    list: 'Search Results',
    brand: 'Adidas',
    category: 'Apparel',
    variant: 'Blue Size L',
    price: 29.99,
    coupon: 'SUMMER2024',
    position: 2,
    quantity: 1,
  },
];

cartItems.forEach((item) => {
  addProduct({
    id: item.id,
    name: item.name,
    list: item.list,
    brand: item.brand,
    category: item.category,
    variant: item.variant,
    price: item.price,
    coupon: item.coupon,
    position: item.position,
    quantity: item.quantity,
  });
});

setCommerceAction('checkout');
Purchase
Very similar to the checkout event, this event occurs when a user completes a purchase.
- Add the transaction data for the purchase. This includes the transaction ID, revenue, tax, shipping, and other details.
- Add the product(s) included in the purchase.
- Set the commerce action to purchase.
- Surfside Browser SDK
- Surfside Node SDK
<script>
  // The transaction data for the purchase
  surf('addTransaction:digital', {
     id: 'TRX-7890',
     affiliation: 'Nike Online Store',
     revenue: 239.97,
     tax: 19.20,
     shipping: 5.99,
     coupon: 'SUMMER2024',
     list: 'Shopping Cart',
     step: 1,
     option: 'Visa',
     currency: 'USD',
  });

  // The product(s) included in purchase
  surf('addProduct:digital', {
    id: '12345',
    name: 'Awesome Sneakers',
    list: 'Shopping Cart',
    brand: 'Nike',
    category: 'Footwear',
    variant: 'Red Size 11',
    price: 79.99,
    coupon: 'SUMMER2024',
    position: 1,
    quantity: 3 // The quantity of the product the user purchased
    currency: 'USD'
  });

  surf('setCommerceAction:digital',
    'purchase' // Purchase Action
  );
</script>
import { addTransaction, addProduct, setCommerceAction } from '@surfside/surfside-events';

// The transaction data for the purchase
addTransaction({
    id: 'ORD-12345',
    affiliation: 'Surfside Store',
    revenue: 109.98,
    tax: 8.99,
    shipping: 5.00,
    coupon: 'SUMMER2024',
    list: 'Shopping Cart',
    step: 1,
    option: 'Visa',
    currency: 'USD',
});

// The product(s) included in purchase
const purchasedItems = [{...}, {...}, {...}] // Array of purchased items

purchasedItems.forEach(item => {
    addProduct({
        id: item.id,
        name: item.name,
        list: item.list,
        brand: item.brand,
        category: item.category,
        variant: item.variant,
        price: item.price,
        coupon: item.coupon,
        position: item.position,
        quantity: item.quantity // The quantity of the product the user purchased
    });
});

setCommerceAction('purchase');
Measuring Refunds (Optional)
To refund an entire transaction, set a refund action and provide the transaction ID:
- Surfside Browser SDK
- Surfside Node SDK
<script>
  // The transaction data for the refund
  surf('addTransaction:digital', {
    id: orderId, // Transaction ID
  });
  // Refund an entire transaction
  surf('setCommerceAction:digital', 'refund');
</script>
import { addTransaction, setCommerceAction } from '@surfside/surfside-events';

// The transaction data for the refund
addTransaction({
  id: orderId,
});
// Refund an entire transaction
setCommerceAction('refund');
To measure a partial refund, set a refund action and specify the transaction ID, product ID(s), and product quantities to be refunded:
- Surfside Browser SDK
- Surfside Node SDK
<script>
  // The transaction data for the refund
  surf('addTransaction:digital', {
    id: orderId,
    affiliation: affiliation,
    revenue: revenue,
    tax: tax,
    shipping: shipping,
    coupon: coupon,
    list: list,
    step: step,
    option: option,
    currency: currency,
  });

  // The product(s) being refunded
  surf('addProduct:digital', {
    id: item.id,
    name: item.name,
    list: item.list,
    brand: item.brand,
    category: item.category,
    variant: item.variant,
    price: item.price,
    quantity: item.quantity,
    coupon: item.coupon,
    position: item.position,
    currency: item.currency,
  });

  surf('setCommerceAction:digital',
    'refund' // Refund Action
  );
</script>
import { addProduct, addTransaction, setCommerceAction } from '@surfside/surfside-events';
// The transaction data for the refund
addTransaction({
  id: orderId,
  affiliation: affiliation,
  revenue: revenue,
  tax: tax,
  shipping: shipping,
  coupon: coupon,
  list: list,
  step: step,
  option: option,
  currency: currency,
});

// The product(s) being refunded
addProduct({
  id: item.id,
  name: item.name,
  list: item.list,
  brand: item.brand,
  category: item.category,
  variant: item.variant,
  price: item.price,
  quantity: item.quantity,
  coupon: item.coupon,
  position: item.position,
  currency: item.currency,
});

setCommerceAction('refund');
4. Measuring Impressions (Optional)
Product impressions are measured using the addImpression command.
Note: An impression must have a name or id value. All other values are optional and don't need to be set.
- Surfside Browser SDK
- Surfside Node SDK
<script>
  surf('addImpression:digital', {
    id: item.id,
    name: item.name
    list: item.list
    brand: item.brand
    category: item.category
    variant: item.varian
    price: item.price
    quantity: item.quantity
    coupon: item.coupon
    position: item.position
    currency: item.currency
  });
</script>
import { addImpression } from '@surfside/surfside-events';

addImpression({
  id: item.id,
  name: item.name,
  list: item.list,
  brand: item.brand,
  category: item.category,
  variant: item.variant,
  price: item.price,
  quantity: item.quantity,
  coupon: item.coupon,
  position: item.position,
  currency: item.currency,
});
An impressionFieldObject must have a name or id value. All other values are optional and don't need to be set.
Combining Impressions and Actions
In cases where you have both product impressions and an action, it is possible to combine and measure this in a single hit.
Note: No events are fired until the
setCommerceActionfunction is called which is used to associate any specific addImpression or addProduct events to the
- Surfside Browser SDK
- Surfside Node SDK
<script>
  surf('addImpression:digital', {
    id: item.id,
    name: item.name,
    list: item.list,
    brand: item.brand,
    category: item.category,
    variant: item.variant,
    price: item.price,
    quantity: item.quantity,
    coupon: item.coupon,
    position: item.position,
    currency: item.currency,
  });

  // The product in focus that was clicked on / viewed in detail
  surf('addProduct:digital', {
    id: item.id,
    name: item.name,
    list: ',
    brand: item.brand,
    category: item.category,
    variant: item.variant,
    price: item.price,
    quantity: item.quantity,
    coupon: item.coupon,
    position: item.position,
    currency: item.currency,
  });

  surf('setCommerceAction:digital',
    'detail' // View Product Action
  );
</script>
import { addImpression, addProduct, setCommerceAction } from '@surfside/surfside-events';

addImpression({
  id: item.id,
  name: item.name,
  list: item.list,
  brand: item.brand,
  category: item.category,
  variant: item.variant,
  price: item.price,
  quantity: item.quantity,
  coupon: item.coupon,
  position: item.position,
  currency: item.currency,
});

// The product in focus that was clicked on / viewed in detail
addProduct({
  id: item.id,
  name: item.name,
  list: item.list,
  brand: item.brand,
  category: item.category,
  variant: item.variant,
  price: item.price,
  quantity: item.quantity,
  coupon: item.coupon,
  position: item.position,
  currency: item.currency,
});

setCommerceAction('detail');
Contact Support
If you need assistance with integration or have any questions, please contact our technical support team:
- Email:
support@surfside.io - Support Portal: Surfside Support